Because the Knew Concepts saws represent such a radical change from what has been traditional in the sawing world, we have encountered a series of questions. Since a picture is worth a thousand words, we have built this section around images, videos, and flowcharts.
Take a few moments to go through the answers to common questions below, and we believe that your questions will be answered. All of the answers are the result of questions that we received either by email, or phone, and other than a few relating to our choice of color, we feel that this pretty much takes care of concerns expressed by you.
If you have a question that is not addressed here, please contact us.
If you’re unsure about which saw fits your project best, see our handy Which Saw Is Right For Me? page.
Technically speaking, they are all hand saws. There are two types of hand saws that we sell:
Both types of saws saws can look pretty similar, but the key distinction is the blade. Coping Saw blades won’t work with Fret Saw frames (and visa-versa) regardless if pinned or not.
Simple. Any frame saw, from the smallest jeweler’s saw, to a 200 pound marquetry chevalet was built with one single purpose—to hold a skinny piece of wire with teeth as tight as it possibly can. No matter what the saw looks like, the whole point is to hold that little wire in place accurately, so the teeth go where the frame points them, not where the grain of the material wants it to go. To give you control.
View our tension testing video to see how strong our saws really are.
In order to get the best performance out of you Knew Concepts saw, you must first understand the Way of the Saw. This is not some mystical disipline; it is simply that you must take a moment to understand your new saw.
For more information, download our handout The Way of the Saw to help you understand saw blades to make sawing easier.
Not sure how to install and tension the blade? View our saw blade tensioning video to see how it is properly done.
Having trouble adjusting the screw clamp on your Knew Concepts saw? Here’s a quick video on how to adjust, or re-adjust the screw clamp.
Because the anvil screw can be moved from one side to the other for those left handed folks out there, alignment of it is important. Our saw blade clamp description video provides you with an excellent visual of what is going on inside the blade clamp. When properly aligned, the blade will go in easily, and when the clamp knob is tightened, the blade will stay straight.
Our video saw blade clamp troubleshooting and cleaning will help explain how our clamps work, how to clean them, and how to keep your saw blade clamped in tight so that it won’t slip out of place.
Our video secret wrench trick for tightening clamps will help explain how to tighten the clamps using a 5/64" allen key without needing to use pliers.
Absolutely! Check out our Slip-on Foam Comfort Grip. It increases the diameter of the saw’s handle without adding weight, while it also makes the handle softer and easier to hang on to. All of which reduces hand stress and fatigue.
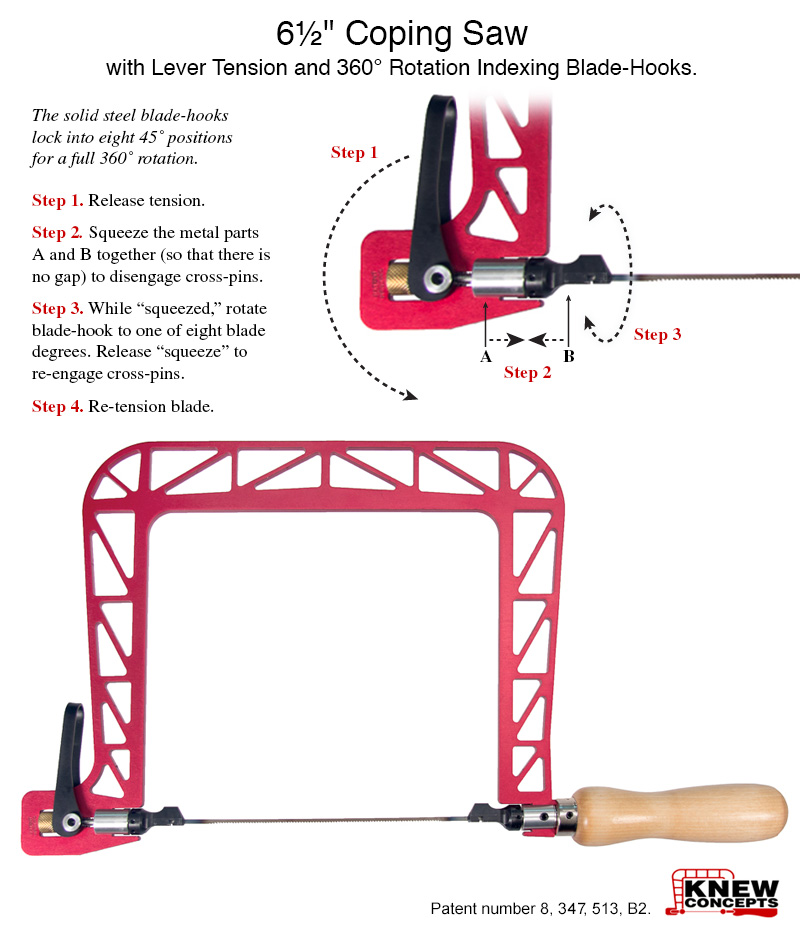
View the enlarged image that shows the steps to release the blade tension, how to squeeze and rotate the indexing blade into the your desired postion, and retension the blade.
Our video, left hand conversion shows you how to remove the blade clamps and replace them to be ready for left handed users.
The What Broke A Blade? video from Kharisma of Popnicute Artisan Jewelry, shows you reason why you break blades and how to avoid it.
Because Knew Concepts saws are so strong, it really doesn’t matter much. But, slacking them off with our lever tensioning system is so easy, it can’t hurt. It would probably be a good idea to slack them off if you’re not going to use your saw for a long period of time. The reason we ship our saws taut is because they’re less likely to break blades during transport.
With traditional style frames made from low-to-medium quality steel, it’s more of a concern, but with the modern aircraft aluminum Knew Concepts uses, it’s not a big deal.
All of our downloadable saw and tool instructions are listed below. The instructions are in Acrobat Reader (.PDF) format. If you don’t have Acrobat Reader, you can download and install Acrobat Reader onto your computer for free from Adobe.com.
We put together this saw frame weight table to easily compare the weight of our saw frames.
We have distributors all over the world. Check out our Worldwide Distributors page for a store near you.
We would be happy to share with you updates and news from us. Please, feel free to sign up to receive our Knewsletter.
Yes, we do save our previous Knewsletter Issues for you to re-read to your hearts content. You can view them all in our Knewsletter Archive.